Pelican 是一个非常出色的 Python 工具,用于创建静态站点。
Full Stack Python 使用 Pelican、Jinja2 模板和 Markdown 生成。该站点部署到 Amazon S3,目前每月处理超过十万名读者。从来没有缩放问题,因为静态站点是在部署之前预先生成的,并且 Web 服务器只是使用现有文件进行响应,而不是在 HTTP 请求-响应周期期间在服务器上执行任何代码。
在本教程中,您将学习如何使用 Pelican 从头开始创建您自己的静态网站。
我们简单的静态网站将有类似于上面截图的页面,但整个网站可以很容易地定制和扩展您自己的设计和内容。
我们的工具
本教程适用于 Python 2 或 3,但强烈建议所有新应用程序使用 Python 3。我使用 Python 3.6.1 来写这篇文章。除了 Python,在整个教程中我们还将使用以下应用程序依赖项:
- Pelicanstatic 站点生成器,版本 3.7.1
- 将 Markdown 处理为内容输入格式的 Markdown 解析库,版本 2.6.8
- Jinja2,一个 Python 模板引擎,版本2.9.6
- pip 和 virtualenv,它们与 Python 3 一起打包,用于安装 Pelican、Markdown 和 Jinja2 库并将其与任何其他 Python 项目隔离
如果您在配置开发环境方面需要帮助,请查看本指南以在 Ubuntu 16.04 LTS 上设置 Python 3 和 Flask
这篇博文中的所有代码都可以在 GitHub 上的 blog-code-examples 存储库的 generating-static-websites-pelican-jinja2-markdown 目录下的 MIT 许可证下获得开源。随意使用和滥用源代码您自己的应用程序。
安装 Pelican 和 Markdown 库
首先为您的项目创建一个新的虚拟环境。我的 virtualenvis 名为 staticsite 但您可以根据您正在创建的项目命名您的名称。
python3 -m venv staticsite
激活虚拟环境。
source staticsite/bin/activate
激活时,virtualenv 会在命令提示符前加上它的名字。

在激活 virtualenv 后安装适当的依赖项。使用 pip 命令安装 Pelican 和 Markdown,这也会安装 Jinja2,因为 Pelican 将其指定为依赖项。
pip install pelican==3.7.1 markdown==2.6.8
运行 pip 命令,安装完所有内容后,您应该会看到类似于以下“已成功安装”消息的输出。
Installing collected packages: pygments, pytz, six, feedgenerator, blinker, unidecode, MarkupSafe, jinja2, python-dateutil, docutils, pelican, markdown
  Running setup.py install for feedgenerator ... done
  Running setup.py install for blinker ... done
  Running setup.py install for MarkupSafe ... done
  Running setup.py install for markdown ... done
Successfully installed MarkupSafe-1.0 blinker-1.4 docutils-0.13.1 feedgenerator-1.9 jinja2-2.9.6 markdown-2.6.8 pelican-3.7.1 pygments-2.2.0 python-dateutil-2.6.0 pytz-2017.2 six-1.10.0 unidecode-0.4.20
现在我们的依赖项已安装到 virtualenv 中,我们可以开始构建我们的静态站点。
生成一个基本站点
创建一个新目录来存储您的项目。我的网站将包含一些我最喜欢的复古合成波艺术家作为示例,但当然您的网站可以包含您想要的任何主题。
创建后进入项目目录
mkdir retrosynth
cd retrosynth
在新项目目录中运行pelican-quickstart 命令。
(staticsite) $ pelican-quickstart
快速启动脚本会回答一堆问题。按照以下答案进行操作,或根据您自己的站点名称和所需配置对其进行修改。
Welcome to pelican-quickstart v3.7.1.

This script will help you create a new Pelican-based website.

Please answer the following questions so this script can generate the files
needed by Pelican.


> Where do you want to create your new web site? [.]
> What will be the title of this web site? RetroSynthwave
> Who will be the author of this web site? Matt Makai
> What will be the default language of this web site? [en]
> Do you want to specify a URL prefix? e.g., http://example.com   (Y/n) n
> Do you want to enable article pagination? (Y/n) n
> What is your time zone? [Europe/Paris] America/New_York
> Do you want to generate a Fabfile/Makefile to automate generation and publishing? (Y/n)y
> Do you want an auto-reload & simpleHTTP script to assist with theme and site development? (Y/n) y
> Do you want to upload your website using FTP? (y/N) n
> Do you want to upload your website using SSH? (y/N) n
> Do you want to upload your website using Dropbox? (y/N) n
> Do you want to upload your website using S3? (y/N) y
> What is the name of your S3 bucket? [my_s3_bucket]
> Do you want to upload your website using Rackspace Cloud Files? (y/N) n
> Do you want to upload your website using GitHub Pages? (y/N) n
Done. Your new project is available at /Users/matt/devel/py/retrosynth
(staticsite) $
我们刚刚使用 Pelican 的快速启动脚本创建了什么?检查目录中的新文件。
(staticsite) $ ls
Makefile        develop_server.sh   pelicanconf.py
content         fabfile.py          publishconf.py
快速入门创建了五个文件和一个新目录:
Makefile:make命令方便任务,用于常见操作,例如运行开发服务器、构建站点和清理无关的构建文件fabfile.py:一个 Fabric 文件,其中包含一些与Makefile相同类型的命令。 Fabric 是一个很棒的代码库,但目前我建议跳过 Fabric 文件,因为不幸的是 Fabric 尚不支持 Python 3。develop_server.sh:用于运行开发服务器的 shell 脚本pelicanconf.py:Pelican 项目的设置文件。如果您习惯使用 Pelican 的早期版本,则此文件被命名为settings.pypublishconf.py:另一个(可选)设置文件,可以是当您过了开发阶段并想要部署您的站点时,将其视为“生产”设置文件content:标记文件的位置,应存储在pages和posts目录
我们可以使用这些文件作为我们新静态站点的基础。让我们通过 Makefile 中的 devserver 任务运行它,看看它在默认情况下是什么样子。
make devserver
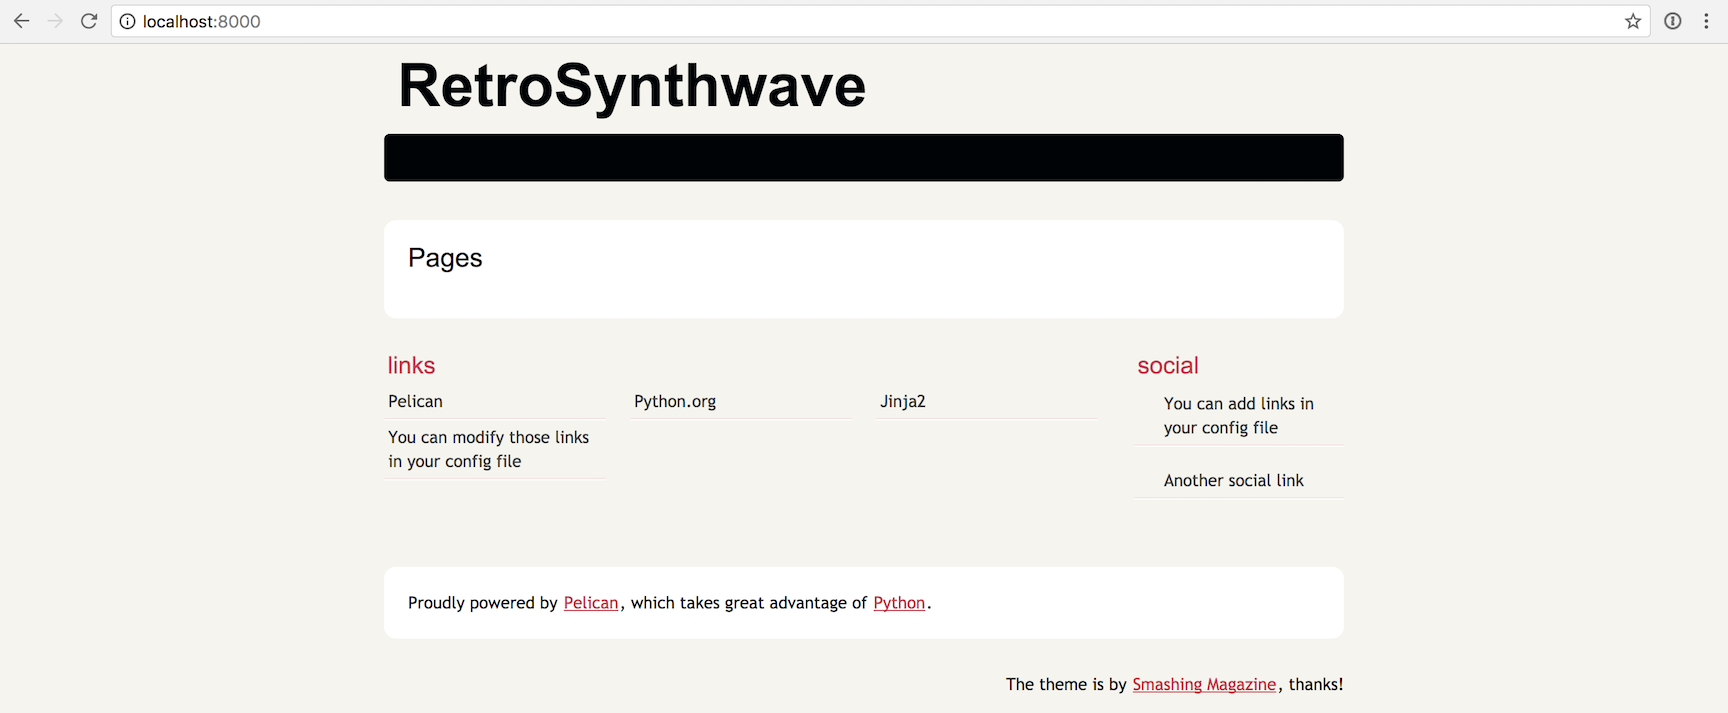
Pelican 开发服务器将开始使用 adaemon 进程为您的网站提供服务。在您的网络浏览器中转到 localhost:8000,您将看到静态站点的第一个版本。
如果您的系统上没有安装make 怎么办?切换到 output 目录并使用 python -m http.server 命令为生成的文件使用内置的 Python 3 HTTP 服务器。
当你想杀死开发服务器时,在你的项目目录下寻找一个名为pelican.pid的文件。 pelican.pid 文件由 Pelican 创建并包含您的开发服务器的进程 ID。
(staticsite) $ cat pelican.pid
1365
使用ps 和grep 命令查看进程,然后使用kill 命令停止进程,如下所示。请记住,您的进程 ID 几乎肯定与我的进程的 1365 ID 不同。
现在关闭开发服务器,这样我们就可以在创建初始内容后使用不同的命令来为我们的网站提供服务。
(staticsite) $ ps -A | grep 1365
 1365 ttys003    0:01.43 /Library/Frameworks/Python.framework/Versions/3.6/Resources/Python.app/Contents/MacOS/Python /Users/matt/Envs/staticsite/bin/pelican --debug --autoreload -r /Users/matt/devel/py/retrosynth/content -o /Users/matt/devel/py/retrosynth/output -s /Users/matt/devel/py/retrosynth/pelicanconf.py
 1411 ttys003    0:00.00 grep 1365
(staticsite) $ kill 1365
(staticsite) $ ps -A | grep 1365
 1413 ttys003    0:00.00 grep 1365
创建站点时是否要使用开发服务器取决于您。每次我想查看我对 Full Stack Python 的更改时,我都会使用我自己的包含 pelican 命令的 Makefile 重新生成站点。 python -m http.server 命令持续提供每个构建的更改。
好的,现在我们有了起始文件,我们可以开始创建一些初始内容了。
写一些内容
Pelican 可以接受 Markdown 和 reStructureTextmarkup 文件作为输入。
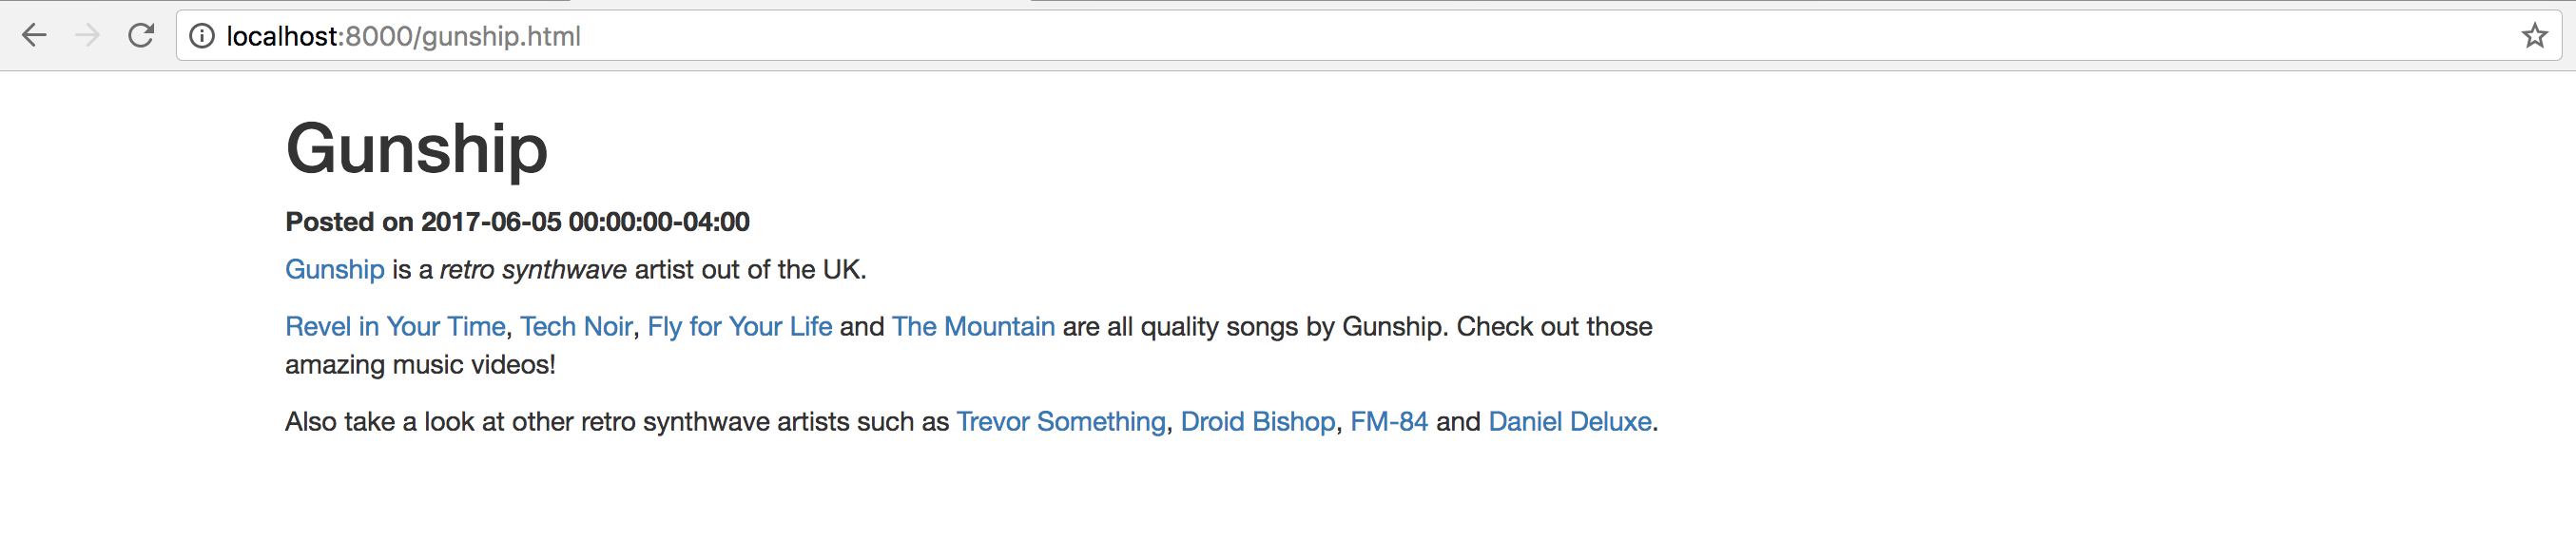
在名为content 的posts 下新建一个子目录。切换到 posts 目录。使用以下内容创建名为 gunship.markdown 的新文件。
title: Gunship
slug: gunship
category: bands
date: 2017-06-09
modified: 2017-06-09


[Gunship](https://www.gunshipmusic.com/) is a *retro synthwave* artist out of the UK.

[Revel in Your Time](https://www.youtube.com/watch?v=uYRZV8dV10w),
[Tech Noir](https://www.youtube.com/watch?v=-nC5TBv3sfU),
[Fly for Your Life](https://www.youtube.com/watch?v=Jv1ZN8c4_Gs)
and
[The Mountain](https://www.youtube.com/watch?v=-HYRTJr8EyA)
are all quality songs by Gunship. Check out those amazing music videos!

Also take a look at other retro synthwave artists such as
[Trevor Something](https://trevorsomething.bandcamp.com/),
[Droid Bishop](https://droidbishop.bandcamp.com/),
[FM-84](https://fm84.bandcamp.com/)
and
[Daniel Deluxe](https://danieldeluxe.bandcamp.com/).
如果我们选择不使用开发服务器,我们的make 文件还可以帮助我们在发生更改时重新生成站点。
我们之前使用了devserver任务,但是我们可以通过Makefile执行哪些其他任务?
make
make 应该向我们展示我们可以运行的以下所有任务。
Makefile for a pelican Web site

Usage:
   make html                           (re)generate the web site
   make clean                          remove the generated files
   make regenerate                     regenerate files upon modification
   make publish                        generate using production settings
   make serve [PORT=8000]              serve site at http://localhost:8000
   make serve-global [SERVER=0.0.0.0]  serve (as root) to :80
   make devserver [PORT=8000]          start/restart develop_server.sh
   make stopserver                     stop local server
   make ssh_upload                     upload the web site via SSH
   make rsync_upload                   upload the web site via rsync+ssh
   make dropbox_upload                 upload the web site via Dropbox
   make ftp_upload                     upload the web site via FTP
   make s3_upload                      upload the web site via S3
   make cf_upload                      upload the web site via Cloud Files
   make github                         upload the web site via gh-pages

Set the DEBUG variable to 1 to enable debugging, e.g. make DEBUG=1 html
Set the RELATIVE variable to 1 to enable relative urls
html 任务是我们要使用我们的pelican 设置文件调用pelicanconf.py 命令的任务。
(staticsite) $ make html
pelican /Users/matt/devel/py/retrosynth/content -o /Users/matt/devel/py/retrosynth/output -s /Users/matt/devel/py/retrosynth/pelicanconf.py
Done: Processed 1 article, 0 drafts, 0 pages and 0 hidden pages in 0.14 seconds.
我们的站点已经重新生成并放置在output目录下。
如果您之前使用过make devserver 命令,那么切换到output 目录并使用以下命令给Python 的内置HTTP 服务器一个机会。
cd output
python -m http.server
我们的第一篇文章充满了荣耀……
如果您想一次为多个静态站点提供服务,或者您已经有一个应用程序绑定到端口 8000,您可以通过在命令后添加一个数字来更改 HTTP 服务器端口绑定。
python -m http.server 8005
请注意,如果您使用的是 Python 2,则等效的 HTTP 服务器命令是python -m SimpleHTTPServer。
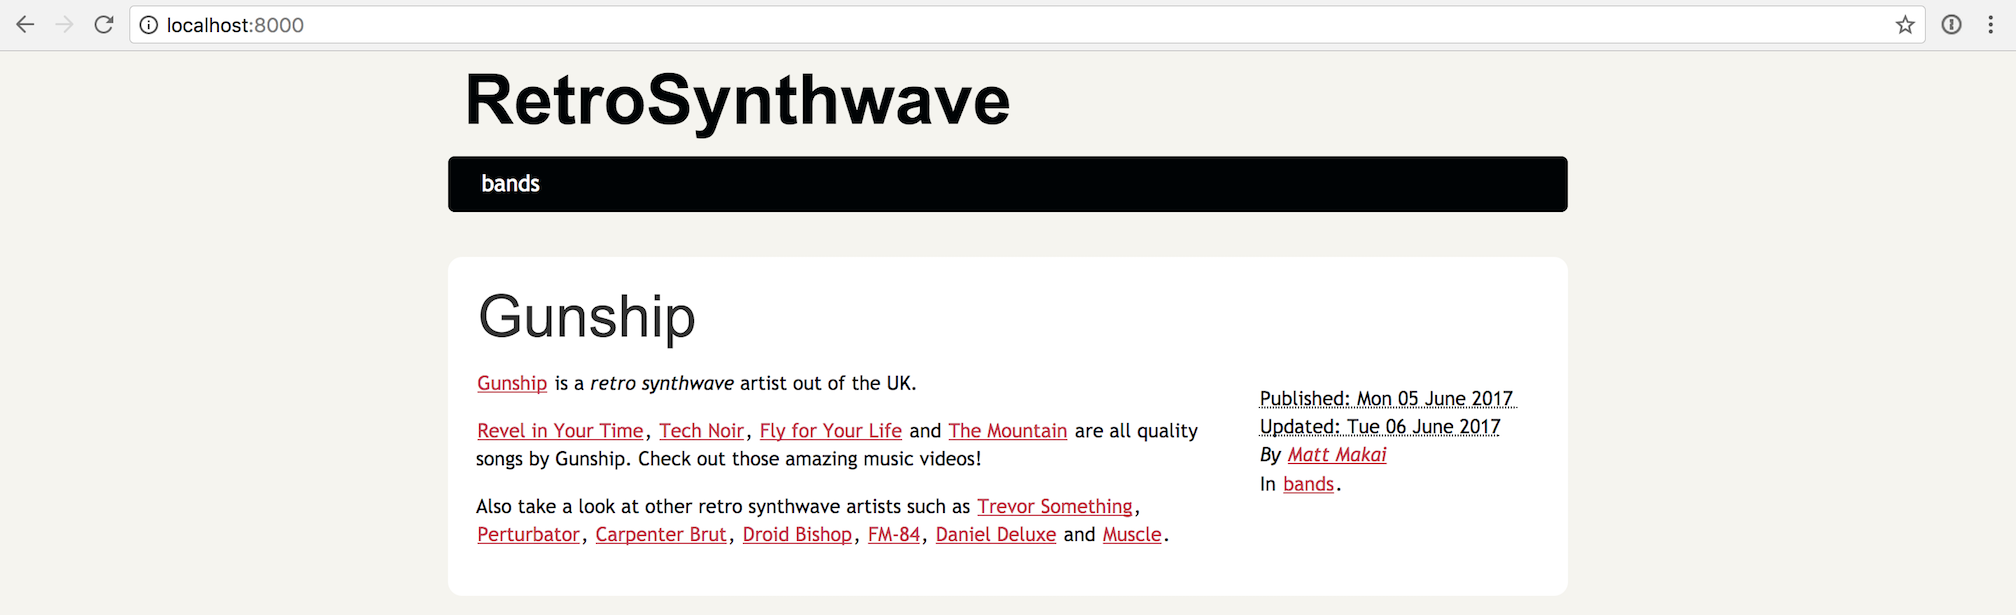
我们的网站现在有一些非常基本的内容。我们可以将此开始扩展到更多帖子和页面,但让我们学习如何修改站点配置。
编辑站点配置
Pelican 的快速入门假设了一堆默认值,这些默认值可能适用于也可能不适用于您的网站。打开 pelicanconf.py 文件来更改一些默认值。
寻找 TIMEZONE 变量。如果它不适合您的位置,请将其修改为您所在的区域。维基百科有一个方便的有效时区值表。
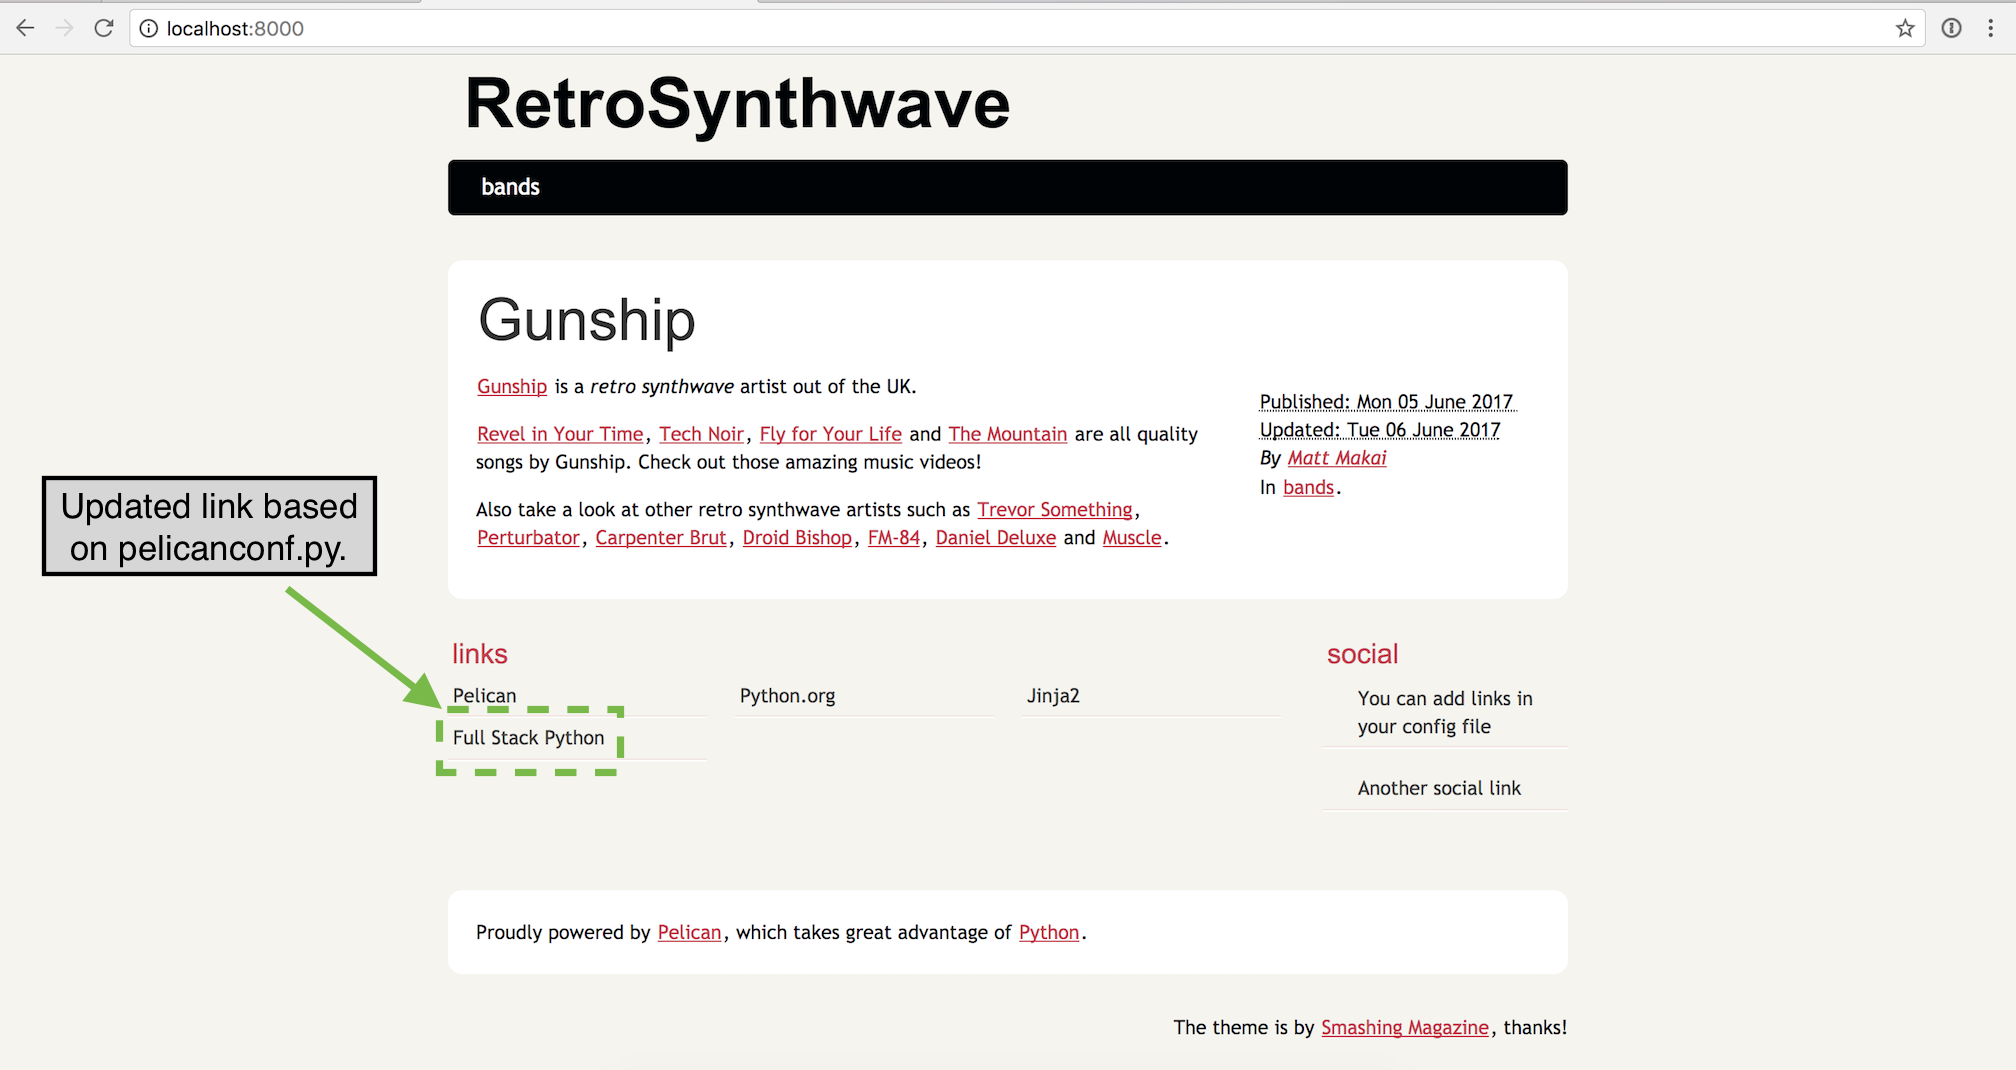
同时修改 LINKS 元组以包含您的站点(或 Full Stack Python!),而不是包含“您可以修改那些链接”链接。更改 LINKS 的最后一行,使其看起来像下面的元组。
# Blogroll
LINKS = (('Pelican', 'http://getpelican.com/'),
         ('Python.org', 'http://python.org/'),
         ('Jinja2', 'http://jinja.pocoo.org/'),
         ('Full Stack Python', 'https://www.fullstackpython.com/'),)
这次我们将直接从命令行调用make html 命令,而不是使用pelican 文件。 Makefile 没有任何问题,但最好直接熟悉 Pelican 而不是仅通过构建文件。
pelican -s pelicanconf.py -o output content
如果您还没有在另一个终端窗口中运行 HTTP 服务器,现在运行它。
cd output
python -m http.server
返回浏览器并刷新以查看更新后的配置。
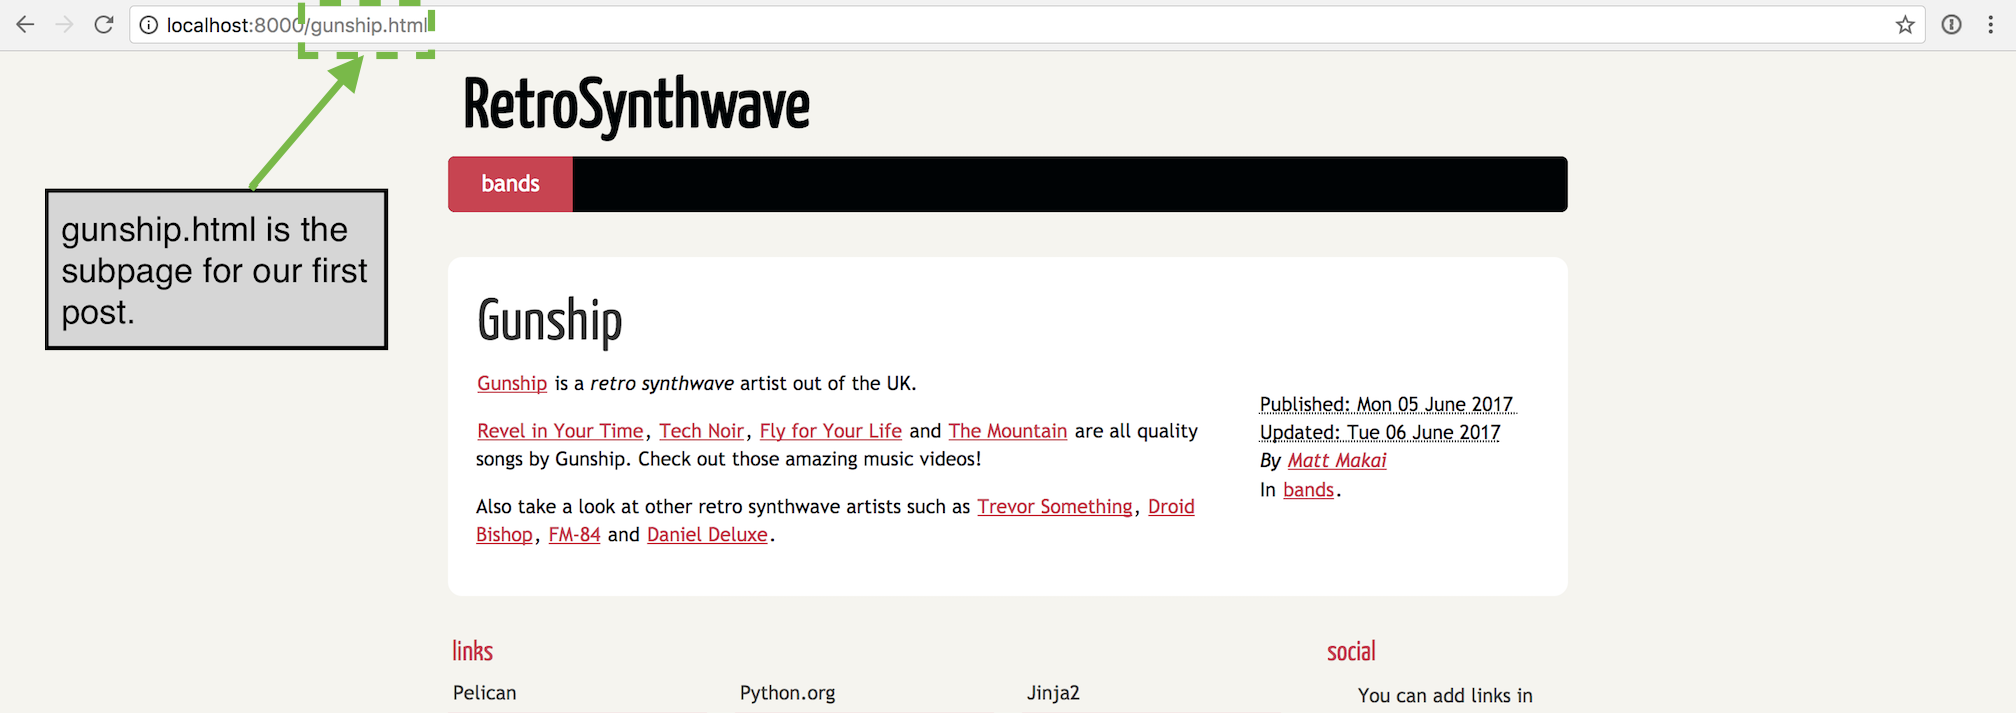
当我们点击博文标题时会发生什么?它将我们带到一个非常相似的页面,其中包含 localhost:8000/gunship.html URL。
好吧,我们更新了一些基本的站点级数据,但我们的站点确实需要换个颜色了。
修改网站主题
更改网站主题是您真正可以将标准博客变成您想要构建的任何类型网站的地方。虽然默认的 Pelican 配置会创建一个博客模板,但如果它不适合您的网站,则您不需要按时间顺序排列结构。
在名为theme 的项目目录下创建一个新目录。在 theme 中创建另一个名为 templates 的目录。templates 是我们的 Jinja2 模板的存储位置,可以覆盖默认主题。
首先创建一个名为 base.html 的文件,该文件将存储整个站点的模板使用的样板文件。
<!DOCTYPE html>
<html lang="en">
<head>
 <title>{% block title %}{% endblock %}</title>
</head>
<body>
 <div class="container">
  {% block content %}{% endblock %}
 </div>
</body>
</html>
在 theme/templates 中创建一个名为 article.html 的文件,该文件的博客帖子主题与站点的其余部分不同。使用以下 Jinja2 标记填充 article.html。
{% extends "base.html" %}

{% block title %}{{ article.title }}{% endblock %}

{% block content %}
<div class="row">
 <div class="col-md-8">
  <h1>{{ article.title }}</h1>
  <label>Posted on <strong>{{ article.date }}</strong></label>
  {{ article.content }}
 </div>
</div>
{% endblock %}
接下来我们将使用 Jinja2 模板来覆盖默认的 index.html 主页。再次在 theme/templates 目录中,使用以下标记创建名为 index.html 的文件。
{% extends "base.html" %}

{% block title %}{{ SITENAME }}{% endblock %}

{% block content %}
<div class="row">
 <div class="col-md-8">
  <h1>{{ SITENAME }}</h1>
  {% for article in articles %}
   <h2><a href="/{{ article.slug }}.html">{{ article.title }}</a></h2>
   <label>Posted on <strong>{{ article.date }}</strong></label>
   {{ article.content|truncate(110) }}
  {% else %}
   No posts yet!
  {% endfor %}
 </div>
</div>
{% endblock %}
重新生成站点并确保您使用开发服务器或 python -m http.server 命令为其提供服务。
确保使用新的 -t theme 标志来指定 theme 目录中的 Jinja2 模板应应用于站点。
pelican -s pelicanconf.py -o output -t theme content
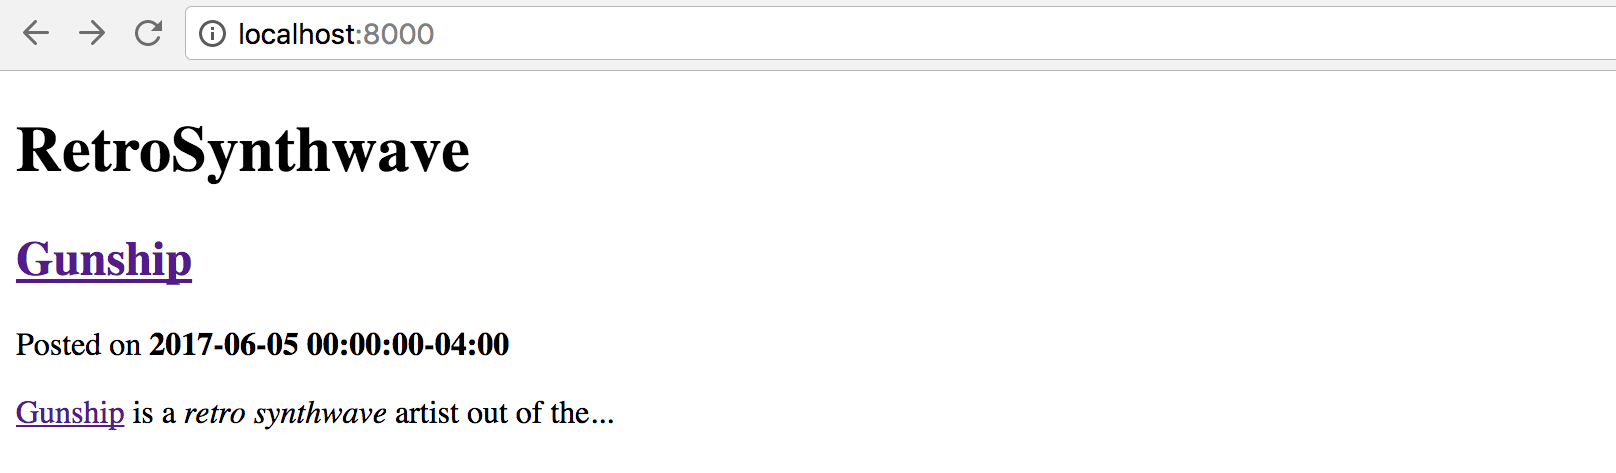
转到 localhost:8000 并刷新页面。主页上的样式现在有所不同,因为它使用了 index.html 主题。
点击 Gunship 帖子的标题。此页面使用 article.html 模板,但很难分辨,因为该页面未应用 CSS。
相当稀疏!我们至少可以将 Bootstrap CSS 添加到 HTML 以对齐我们的内容。
在 base.html 中,在 <title>{% block title %}{% endblock %}</title> 和 </head> 之上为 Bootstrap 添加以下行。
<!-- Latest compiled and minified Bootstrap CSS -->
<link rel="stylesheet" href="https://maxcdn.bootstrapcdn.com/bootstrap/3.3.7/css/bootstrap.min.css" integrity="sha384-BVYiiSIFeK1dGmJRAkycuHAHRg32OmUcww7on3RYdg4Va+PmSTsz/K68vbdEjh4u" crossorigin="anonymous">
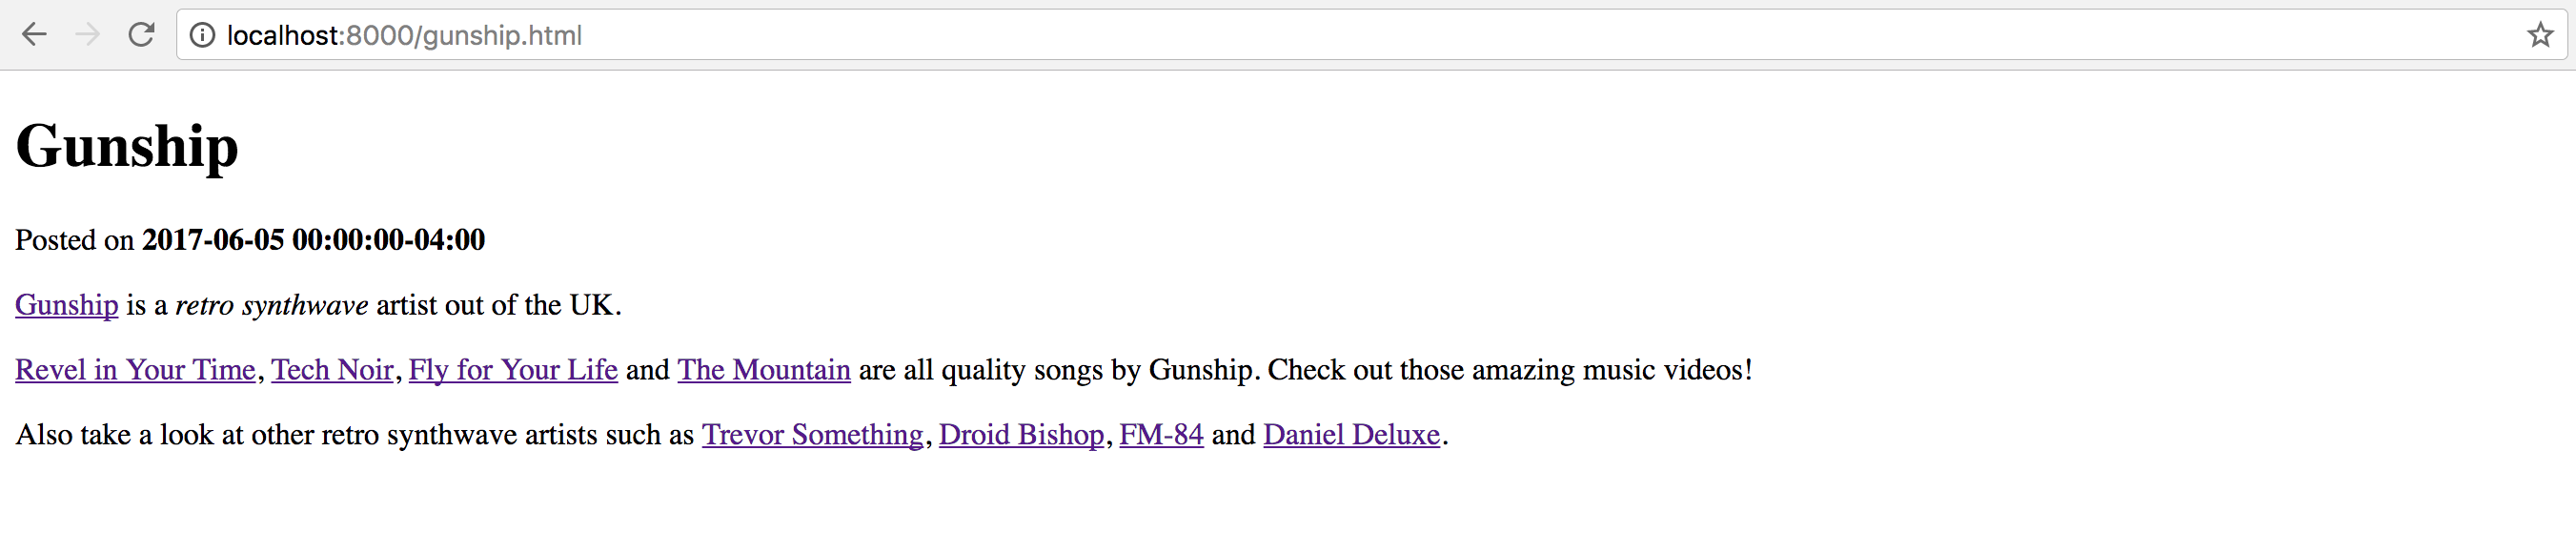
重新生成站点并刷新 Gunship 页面。
至少我们的设计已从 1996 年转移到 2001 年。我相信您可以做更多的事情来改进您自己网站的设计。
新的 base.html 还没有提供太多主题,但它至少为完全自定义的网站提供了一个全新的开始。
下一步是什么?
您使用 Markdown 和 Jinja2 生成了您的第一个 Pelican 静态网站。可以对 Jinja2 模板和 Markdown 文件中包含的内容进行其他修改。
您想将新的静态网站部署到 GitHub Pages 还是 S3 存储桶?好吧,这是另一个完整堆栈 Python 教程的故事…
有问题吗?在 Twitter@fullstackpython 或@mattmakai 上通过 Full Stack Python 存储库上的 GitHub 问题单让我知道。
看到这篇博文有什么问题了吗?在 GitHub 上创建此页面的源代码并提交拉取请求。
