当您有一个或多个人谈话的录音时,采用高度准确和自动化的方式将口语提取为文本会很有用。获得文本后,您可以将其用于进一步分析或用作辅助功能。
在本教程中,我们将使用名为 AssemblyAI 的高精度语音到文本 Web 应用程序编程接口从 MP3 录音中提取文本(也支持许多其他格式)。
使用本教程中的代码,您将能够获取包含语音的音频文件(例如我录制的这个示例)并输出高度准确的文本转录,如下所示:
An object relational mapper is a code library that automates the transfer of
data stored in relational, databases into objects that are more commonly used
in application code or EMS are useful because they provide a high level
abstraction upon a relational database that allows developers to write Python
code instead of sequel to create read update and delete, data and schemas in
their database. Developers can use the programming language. They are
comfortable with to work with a database instead of writing SQL...

(the text goes on from here but I abbreviated it at this point)
教程要求
在本教程中,我们将使用以下依赖项,稍后我们将安装这些依赖项。确保您的环境中还安装了 Python 3,最好是 3.6 或更新版本:
我们将使用以下依赖项来完成本教程:
- 请求版本 2.24.0 向 AssemblyAI speech-to-textAPI 发出 HTTP 请求
- 一个 AssemblyAI 帐户,您可以在此处注册一个免费的 API 访问密钥
这篇博文中的所有代码都可以在 GitHub 上的 blog-code-examples 存储库的 transcribe-speech-text-script 目录下的 MIT 许可下获得开源。根据您自己的项目的需要使用源代码。
搭建开发环境
切换到您保存 Python 虚拟环境的目录。我将我的保存在用户主目录中名为 venvs 的子目录中。使用以下命令为此项目创建一个新的 virtualenv。
python3 -m venv ~/venvs/pytranscribe
使用 activate shell 脚本激活 virtualenv:
source ~/venvs/pytranscribe/bin/activate
执行上述命令后,命令提示符会发生变化,virtualenv 的名称会被添加到原始命令提示符格式的前面,因此如果您的提示符只是$,它现在看起来像下面这样:
(pytranscribe) $
请记住,您必须在每个要在 virtualenv 中使用依赖项的新终端窗口中激活您的 virtualenv。
我们现在可以将 requests 包安装到已激活但为空的 virtualenv 中。
pip install requests==2.24.0
查找类似于以下内容的输出以确认已从 PyPI 正确安装了适当的包。
(pytranscribe) $ pip install requests==2.24.0
Collecting requests==2.24.0
  Using cached https://files.pythonhosted.org/packages/45/1e/0c169c6a5381e241ba7404532c16a21d86ab872c9bed8bdcd4c423954103/requests-2.24.0-py2.py3-none-any.whl
Collecting certifi>=2017.4.17 (from requests==2.24.0)
  Using cached https://files.pythonhosted.org/packages/5e/c4/6c4fe722df5343c33226f0b4e0bb042e4dc13483228b4718baf286f86d87/certifi-2020.6.20-py2.py3-none-any.whl
Collecting urllib3!=1.25.0,!=1.25.1,<1.26,>=1.21.1 (from requests==2.24.0)
  Using cached https://files.pythonhosted.org/packages/9f/f0/a391d1463ebb1b233795cabfc0ef38d3db4442339de68f847026199e69d7/urllib3-1.25.10-py2.py3-none-any.whl
Collecting chardet<4,>=3.0.2 (from requests==2.24.0)
  Using cached https://files.pythonhosted.org/packages/bc/a9/01ffebfb562e4274b6487b4bb1ddec7ca55ec7510b22e4c51f14098443b8/chardet-3.0.4-py2.py3-none-any.whl
Collecting idna<3,>=2.5 (from requests==2.24.0)
  Using cached https://files.pythonhosted.org/packages/a2/38/928ddce2273eaa564f6f50de919327bf3a00f091b5baba8dfa9460f3a8a8/idna-2.10-py2.py3-none-any.whl
Installing collected packages: certifi, urllib3, chardet, idna, requests
Successfully installed certifi-2020.6.20 chardet-3.0.4 idna-2.10 requests-2.24.0 urllib3-1.25.10
我们已经安装了所有必需的依赖项,因此我们可以开始编写应用程序了。
上传、启动和转录音频
我们拥有开始构建将音频转录为文本的应用程序所需的一切。我们将在三个文件中构建此应用程序:
- upload_audio_file.py:将您的音频文件上传到 AssemblyAI 服务的安全位置,以便可以访问它进行处理。如果您的音频文件已经可以通过公共 URL 访问,则无需执行此步骤,只需按照此快速入门即可
- initiate_transcription.py:告诉 API 要转录哪个文件并立即开始
- get_transcription.py:如果仍在处理则打印转录状态,或在处理完成时显示转录结果
li>
创建一个名为pytranscribe 的新目录来存储我们编写的这些文件。然后切换到新的项目目录。
mkdir pytranscribe
cd pytranscribe
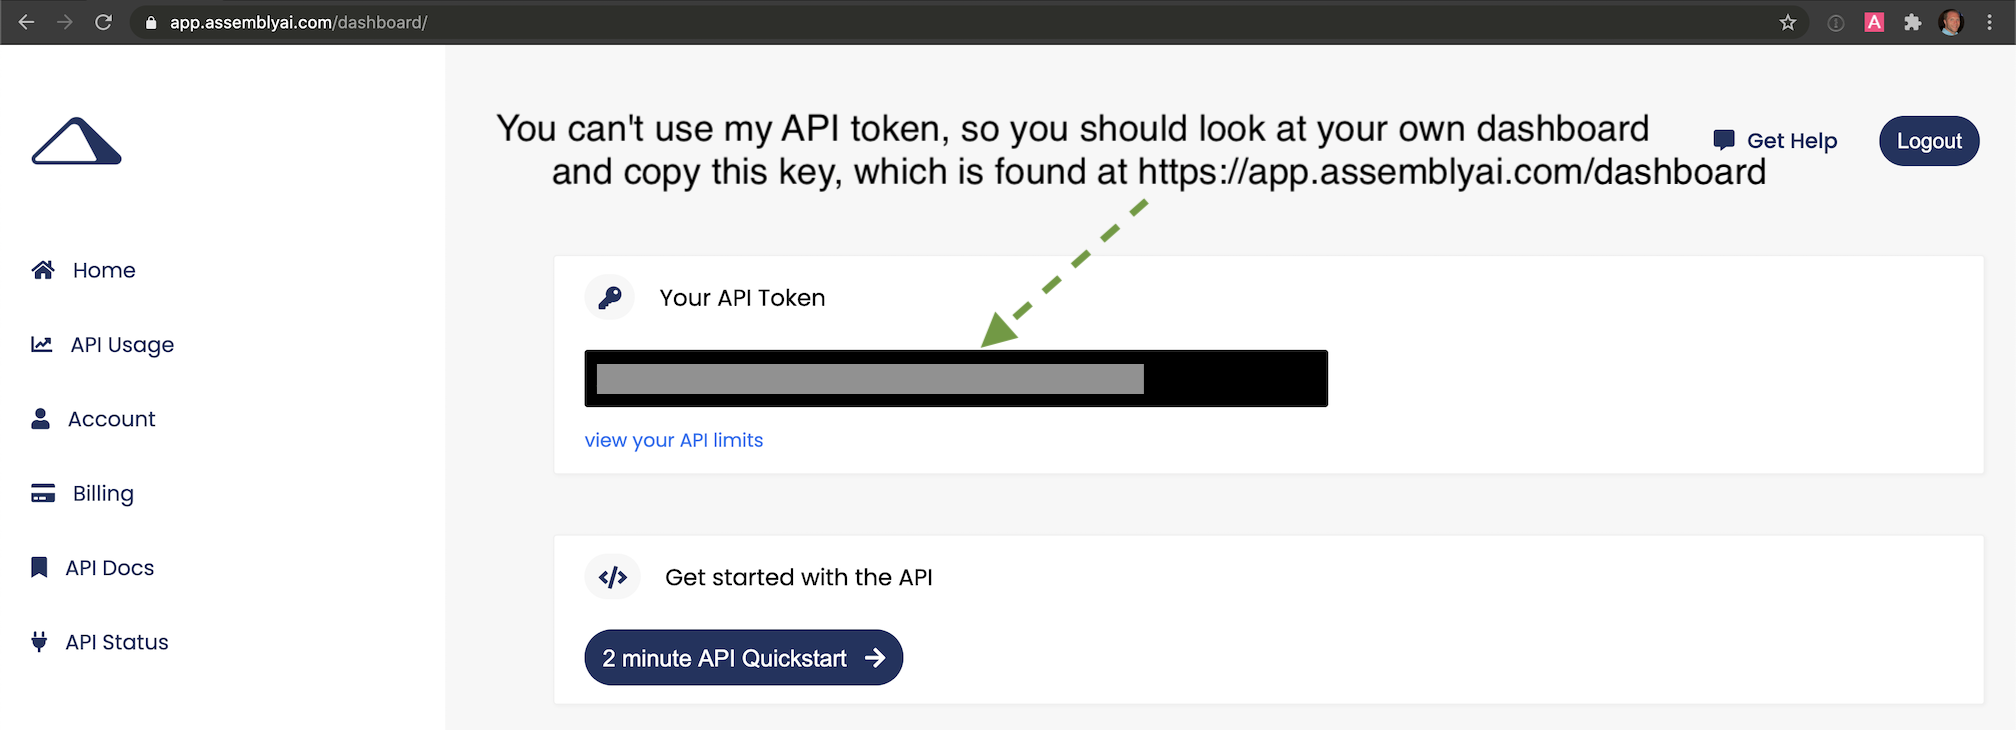
我们还需要将我们的 AssemblyAI API 密钥导出为环境变量。注册一个 AssemblyAI 帐户并登录到 AssemblyAI 仪表板,然后复制“您的 API 令牌”,如屏幕截图所示:
export ASSEMBLYAI_KEY=your-api-key-here
请注意,您必须在每个命令行窗口中使用 export 命令来确保可以访问此键。如果您在运行脚本的环境中没有将令牌导出为 ASSEMBLYAI_KEY,我们正在编写的脚本将无法访问 API。
现在我们已经创建了项目目录并将 API 密钥设置为环境变量,让我们继续为将音频文件上传到 AssemblyAI 服务的第一个文件编写代码。
上传音频文件进行转录
创建一个名为upload_audio_file.py 的新文件并将以下代码放入其中:
import argparse
import os
import requests


API_URL = "https://api.assemblyai.com/v2/"


def upload_file_to_api(filename):
    """Checks for a valid file and then uploads it to AssemblyAI
    so it can be saved to a secure URL that only that service can access.
    When the upload is complete we can then initiate the transcription
    API call.
    Returns the API JSON if successful, or None if file does not exist.
    """
    if not os.path.exists(filename):
        return None

    def read_file(filename, chunk_size=5242880):
        with open(filename, 'rb') as _file:
            while True:
                data = _file.read(chunk_size)
                if not data:
                    break
                yield data

    headers = {'authorization': os.getenv("ASSEMBLYAI_KEY")}
    response = requests.post("".join([API_URL, "upload"]), headers=headers,
                             data=read_file(filename))
    return response.json()
上面的代码导入了argparse、os和requests包,以便我们可以在这个脚本中使用它们。 API_URL 是一个常量,它具有 AssemblyAI 服务的基本 URL。我们用一个参数定义upload_file_to_api 函数,filename应该是一个字符串,包含文件的绝对路径及其文件名。
在函数中,我们检查文件是否存在,然后使用 Request 的分块传输编码将大文件流式传输到 AssemblyAI API。
os 模块的 getenv 函数读取在命令行上使用 export 命令设置的 API ###。确保在运行此脚本的终端中使用 getenv 命令,否则 export 值将为空。如有疑问,请使用 ASSEMBLYAI_KEY 查看该值是否与您的 API 密钥匹配。
要使用upload_file_to_api 函数,请在upload_audio_file.py 文件中附加以下代码行,以便我们可以将此代码正确执行为使用### 命令:
if __name__ == "__main__":
    parser = argparse.ArgumentParser()
    parser.add_argument("filename")
    args = parser.parse_args()
    upload_filename = args.filename
    response_json = upload_file_to_api(upload_filename)
    if not response_json:
        print("file does not exist")
    else:
        print("File uploaded to URL: {}".format(response_json['upload_url']))
上面的代码创建了一个 ArgumentParser 对象,它允许应用程序从命令行获取单个参数来指定我们想要访问、读取和上传到 AssmeblyAI 服务的文件。
如果文件不存在,脚本将打印找不到文件的消息。在我们确实在该路径找到正确文件的快乐路径中,然后使用 upload_file_to_api 函数中的代码上传文件。
通过使用 upload_audio_file.py 命令在命令行上运行它来执行已完成的 python 脚本。将 FULL_PATH_TO_FILE 替换为您要上传的文件的绝对路径,例如 /Users/matt/devel/audio.mp3。
python upload_audio_file.py FULL_PATH_TO_FILE
假设文件在您指定的位置找到,当脚本完成上传文件时,它将打印一条消息,如下所示,带有唯一的 URL:
File uploaded to URL: https://cdn.assemblyai.com/upload/463ce27f-0922-4ea9-9ce4-3353d84b5638
此 URL 不公开,只能由 AssemblyAI 服务使用,因此除了您和他们的转录 API 之外,其他任何人都无法访问您的文件及其内容。
重要的部分是 URL 的最后一部分,在这个例子中是 463ce27f-0922-4ea9-9ce4-3353d84b5638。保存该唯一标识符,因为我们需要将其传递到启动转录服务的下一个脚本中。
开始转录
接下来,我们将编写一些代码来启动转录。创建一个名为 initiate_transcription.py 的新文件。将以下代码添加到新文件中。
import argparse
import os
import requests


API_URL = "https://api.assemblyai.com/v2/"
CDN_URL = "https://cdn.assemblyai.com/"


def initiate_transcription(file_id):
    """Sends a request to the API to transcribe a specific
    file that was previously uploaded to the API. This will
    not immediately return the transcription because it takes
    a moment for the service to analyze and perform the
    transcription, so there is a different function to retrieve
    the results.
    """
    endpoint = "".join([API_URL, "transcript"])
    json = {"audio_url": "".join([CDN_URL, "upload/{}".format(file_id)])}
    headers = {
        "authorization": os.getenv("ASSEMBLYAI_KEY"),
        "content-type": "application/json"
    }
    response = requests.post(endpoint, json=json, headers=headers)
    return response.json()
我们有与之前脚本相同的导入,并且我们添加了一个新常量,CDN_URL,它与 AssemblyAI 存储上传的音频文件的单独 URL 相匹配。
initiate_transcription 函数本质上只是向 AssemblyAI API 设置一个 HTTP 请求,以在传入的特定 URL 处开始对音频文件的转录过程。这就是为什么要传入 # ## 很重要:它完成了我们告诉 AssemblyAI 检索的音频文件的 URL。
通过附加此代码来完成文件,以便可以从带有参数的命令行轻松调用它。
if __name__ == "__main__":
    parser = argparse.ArgumentParser()
    parser.add_argument("file_id")
    args = parser.parse_args()
    file_id = args.file_id
    response_json = initiate_transcription(file_id)
    print(response_json)
通过在python 文件上运行initiate_transcription 命令启动脚本,并传入您从上一步保存的唯一文件标识符。
# the FILE_IDENTIFIER is returned in the previous step and will
# look something like this: 463ce27f-0922-4ea9-9ce4-3353d84b5638
python initiate_transcription.py FILE_IDENTIFIER
API 会将此脚本打印到命令行的 JSON 响应发回。
{'audio_end_at': None, 'acoustic_model': 'assemblyai_default', 'text': None,
 'audio_url': 'https://cdn.assemblyai.com/upload/463ce27f-0922-4ea9-9ce4-3353d84b5638',
 'speed_boost': False, 'language_model': 'assemblyai_default', 'redact_pii': False,
 'confidence': None, 'webhook_status_code': None,
 'id': 'gkuu2krb1-8c7f-4fe3-bb69-6b14a2cac067', 'status': 'queued', 'boost_param': None,
 'words': None, 'format_text': True, 'webhook_url': None, 'punctuate': True,
 'utterances': None, 'audio_duration': None, 'auto_highlights': False,
 'word_boost': [], 'dual_channel': None, 'audio_start_from': None}
记下 JSON 响应中 id 键的值。这是我们需要用来检索转录结果的转录标识符。在本例中,它是 gkuu2krb1-8c7f-4fe3-bb69-6b14a2cac067。在您自己的回复中复制转录标识符,因为我们将需要它来检查下一步转录过程何时完成。
获取转录结果
我们已经上传并开始了转录过程,所以让我们在准备好后尽快得到结果。
返回结果需要多长时间取决于文件的大小,因此下一个脚本将向 API 发送 HTTP 请求并报告转录状态,或者在完成时打印输出。
创建第三个名为 get_transcription.py 的 Python 文件,并将以下代码放入其中。
import argparse
import os
import requests


API_URL = "https://api.assemblyai.com/v2/"


def get_transcription(transcription_id):
    """Requests the transcription from the API and returns the JSON
    response."""
    endpoint = "".join([API_URL, "transcript/{}".format(transcription_id)])
    headers = {"authorization": os.getenv('ASSEMBLYAI_KEY')}
    response = requests.get(endpoint, headers=headers)
    return response.json()


if __name__ == "__main__":
    parser = argparse.ArgumentParser()
    parser.add_argument("transcription_id")
    args = parser.parse_args()
    transcription_id = args.transcription_id
    response_json = get_transcription(transcription_id)
    if response_json['status'] == "completed":
        for word in response_json['words']:
            print(word['text'], end=" ")
    else:
        print("current status of transcription request: {}".format(
              response_json['status']))
上面的代码与其他脚本具有相同的导入。在这个新的 get_transcription 函数中,我们只需使用我们的 API 密钥和上一步中的转录标识符(不是文件标识符)调用 AssemblyAI API。我们检索 JSON 响应并将其返回。
在 main 函数中,我们处理作为命令行参数传入的转录标识符,并将其传递到 get_transcription 函数中。如果来自 get_transcription 函数的响应 JSON 包含 completed 状态,那么我们将打印转录结果。否则,在 queued 之前打印 processing 或 completed 的当前状态。
使用命令行和上一节中的转录标识符调用脚本:
python get_transcription.py TRANSCRIPTION_ID
如果该服务尚未开始处理转录本,那么它将像这样返回 queued:
current status of transcription request: queued
当服务当前正在处理音频文件时,它将返回 processing:
current status of transcription request: processing
该过程完成后,我们的脚本将返回转录文本,如您在此处看到的:
An object relational mapper is a code library that automates the transfer of
data stored in relational, databases into objects that are more commonly used
in application code or EMS are useful because they provide a high level

...(output abbreviated)
就是这样,我们得到了我们的转录!
您可能想知道,如果准确度不符合您的情况,该怎么办。这就是提高关键字或短语准确性的用武之地。您可以使用这两种方法中的任何一种来将录音的准确性提高到适合您的情况的可接受水平。
下一步是什么?
我们刚刚编写了一些调用 AssemblyAI API 的脚本,以将带有语音的录音转录为文本输出。
接下来,看看他们的一些更高级的文档,这些文档超出了本教程中的基础知识:
- 支持的文件格式
- 转录双声道/立体声录音
- 获取说话人标签(说话人二值化)
有问题吗?在 Twitter@fullstackpython 或@mattmakai 上通过 Full Stack Python 存储库上的问题单让我知道。看到这篇文章有什么问题吗?在 GitHub 上创建此页面的源代码并提交拉取请求。
