使用 Twilio 的可编程语音 API 可以很容易地录制与一个或多个参与者的电话通话,但语音到文本的准确性可能很差,尤其是对于来自医疗保健和工程等利基领域的单词的转录。AssemblyAI 的转录 API 提供了更高的准确性默认和通过可选的关键字列表。录音的准确性。
在本教程中,我们将向 AssemblyAI 的 API 录制出站 Twilio 呼叫录音,以获得更准确的语音到文本输出。
教程先决条件
确保您已安装 Python 3,因为 Python 2 在 2020 年初达到了生命周期的尽头,不再受支持。最好在您的开发环境中安装 Python 3.7 或更高版本。本教程还将使用:
我们将使用以下依赖项来完成本教程:
- Django 版本 3.1.x,其中 x 是最新的安全版本
- 一个 Twilio 帐户和 Python Twilio 帮助程序库版本 6.45.2 或更高版本
- requestsversion 2.24.0
- 一个AssemblyAI账号,你可以在这里注册一个免费的key API access key
这篇博文中的所有代码都可以在 GitHub 上的 blog-code-examples 存储库的 django-accurate-twilio-voice-transcriptions 目录下的 MIT 许可证下获得开源。根据您自己项目的需要使用源代码。
配置我们的开发环境
切换到您保存 Python 虚拟环境的目录。使用以下命令为此项目创建一个新的虚拟环境。
通过使用以下命令创建一个新的虚拟环境来启动 Django 项目。我建议使用一个单独的目录,例如 ~/venvs/(波浪号是您用户的 home 目录的快捷方式),以便您始终知道所有 virtualenvs 的位置。
python3 -m venv ~/venvs/djtranscribe
使用 activate shell 脚本激活 virtualenv:
source ~/venvs/djtranscribe/bin/activate
执行完上面的命令后,命令提示符会发生变化,virtualenv 的名字会被添加到原来的命令提示符格式中,所以如果你的提示符只是$,它现在看起来像下面这样:
(djtranscribe) $
请记住,您必须在每个要在 virtualenv 中使用依赖项的新终端窗口中激活您的 virtualenv。
我们现在可以将 Djangopackage 安装到已激活但为空的 virtualenv 中。
pip install django==3.1.3 requests==2.24.0 twilio==6.45.2
查找类似于以下内容的输出以确认已从 PyPI 正确安装了适当的包。
(djtranscribe) $ pip install django==3.1.3 requests==2.24.0 twilio=6.45.2 pip install django requests twilio Collecting django Downloading Django-3.1.3-py3-none-any.whl (7.8 MB) |ââââââââââââââââââââââââââââââââ| 7.8 MB 2.6 MB/s Collecting requests Using cached requests-2.24.0-py2.py3-none-any.whl (61 kB) Collecting twilio Downloading twilio-6.47.0.tar.gz (460 kB) |ââââââââââââââââââââââââââââââââ| 460 kB 19.6 MB/s Collecting sqlparse>=0.2.2 Downloading sqlparse-0.4.1-py3-none-any.whl (42 kB) |ââââââââââââââââââââââââââââââââ| 42 kB 4.8 MB/s Collecting pytz Downloading pytz-2020.4-py2.py3-none-any.whl (509 kB) |ââââââââââââââââââââââââââââââââ| 509 kB 31.0 MB/s Collecting asgiref<4,>=3.2.10 Downloading asgiref-3.3.0-py3-none-any.whl (19 kB) Collecting chardet<4,>=3.0.2 Using cached chardet-3.0.4-py2.py3-none-any.whl (133 kB) Collecting idna<3,>=2.5 Using cached idna-2.10-py2.py3-none-any.whl (58 kB) Collecting certifi>=2017.4.17 Using cached certifi-2020.6.20-py2.py3-none-any.whl (156 kB) Collecting urllib3!=1.25.0,!=1.25.1,<1.26,>=1.21.1 Downloading urllib3-1.25.11-py2.py3-none-any.whl (127 kB) |ââââââââââââââââââââââââââââââââ| 127 kB 24.5 MB/s Collecting six Using cached six-1.15.0-py2.py3-none-any.whl (10 kB) Collecting PyJWT>=1.4.2 Using cached PyJWT-1.7.1-py2.py3-none-any.whl (18 kB) Using legacy 'setup.py install' for twilio, since package 'wheel' is not installed. Installing collected packages: sqlparse, pytz, asgiref, django, chardet, idna, certifi, urllib3, requests, six, PyJWT, twilio Running setup.py install for twilio ... done Successfully installed PyJWT-1.7.1 asgiref-3.3.0 certifi-2020.6.20 chardet-3.0.4 django-3.1.3 idna-2.10 pytz-2020.4 requests-2.24.0 six-1.15.0 sqlparse-0.4.1 twilio-6.47.0 urllib3-1.25.11
现在我们已经安装了所有必需的依赖项,我们可以开始编写应用程序了。
开始我们的 Django 项目
让我们开始编写我们的应用程序。
我们可以使用 Django django-admin 工具创建样板代码结构来启动我们的项目。切换到您开发应用程序的目录。例如,我通常对所有 myPython 项目使用 /Users/matt/devel/py/。然后运行以下命令启动一个名为djtranscribe的Django项目:
django-admin.py startproject djtranscribe
请注意,在本教程中,我们对 virtualenv 和 Django 项目目录使用相同的名称,但如果您更喜欢使用不同的名称来组织自己的项目。
django-admin 命令创建一个名为 djtranscribe 的目录以及几个子目录,如果您以前使用过 Django,您应该熟悉这些子目录。
将目录更改为新项目。
cd djtranscribe
在 djtranscribe 中创建一个名为 caller 的新 Django 应用。
python manage.py startapp caller
Django 将在项目中生成一个名为 caller 的新文件夹。我们应该更新 URL,以便在我们编写 views.py 代码之前可以访问该应用程序。
打开###。添加突出显示的行,以便 URL 解析器将检查 djtranscribe/djtranscribe/urls.py 应用程序是否有其他路由与此 Django 应用程序请求的 URL 相匹配。
# djtranscribe/djtranscribe/urls.py
from django.conf.urls import include
from django.contrib import admin
from django.urls import path


urlpatterns = [
    path('', include('caller.urls')),
    path('admin/', admin.site.urls),
]
保存djtranscribe/djtranscribe/urls.py并打开djtranscribe/djtranscribe/settings.py。将caller应用添加到settings.py 通过插入突出显示的行:
# djtranscribe/djtranscribe/settings.py
# Application definition

INSTALLED_APPS = [
    'django.contrib.admin',
    'django.contrib.auth',
    'django.contrib.contenttypes',
    'django.contrib.sessions',
    'django.contrib.messages',
    'django.contrib.staticfiles',
    'caller',
]
在将任何代码部署到生产环境之前,请确保更改 DEBUG 中的默认 SECRET_KEY 和 settings.py 值。使用 Django 生产部署清单中的信息正确保护您的应用程序,这样您就不会将您的项目添加到网络上的被黑应用程序列表中。
保存并关闭settings.py。
接下来进入djtranscribe/caller 目录。创建一个名为 urls.py 的新文件以包含 caller 应用程序的路由。
将所有这些行添加到空的 djtranscribe/caller/urls.py 文件中。
# djtranscribe/caller/urls.py
from django.conf.urls import url
from . import views

urlpatterns = [
    url(r'', views.index, name="index"),
]
保存###。打开djtranscribe/caller/urls.py 以添加以下两个突出显示的行。
# djtranscribe/caller/views.py
from django.http import HttpResponse


def index(request):
    return HttpResponse('Hello, world!', 200)
在我们开始向项目添加功能的实质之前,我们可以测试这个简单的样板响应是否正确。切换到 manage.py 文件所在的 Django 项目的基本目录。使用以下命令执行开发服务器:
python manage.py runserver
Django 开发服务器启动时应该没有任何问题,除了未应用的迁移警告。
Watching for file changes with StatReloader
Performing system checks...

System check identified no issues (0 silenced).

November 15, 2020 - 14:07:03
Django version 3.1.3, using settings 'djtranscribe.settings'
Starting development server at http://127.0.0.1:8000/
Quit the server with CONTROL-C.
打开网络浏览器并转到localhost:8000。
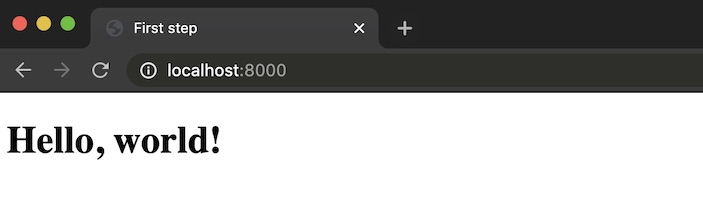
您应该看到“Hello, world!”在浏览器中呈现。这意味着到目前为止一切正常,我们现在可以将拨号、录音和转录功能添加到我们的 Django 项目中。
将 Twilio 添加到 Django 项目
是时候将 Twilio 的语音 API 添加到组合中,这样我们就可以从我们的 Django 项目拨打电话并进行录音。
首先打开 djtranscribe/djtranscribe/settings.py 并使用以下突出显示的 import os 行对其进行修改:
# djtranscribe/djtranscribe/settings.py
import os
from pathlib import Path


# Build paths inside the project like this: BASE_DIR / 'subdir'.
BASE_DIR = Path(__file__).resolve().parent.parent
然后在settings.py 文件的底部,添加以下突出显示的行,这些行将是从我们稍后配置的环境变量中提取的设置。
# Static files (CSS, JavaScript, Images)
# https://docs.djangoproject.com/en/3.1/howto/static-files/

STATIC_URL = '/static/'


BASE_URL = os.getenv("BASE_URL")
TWIML_INSTRUCTIONS_URL = "{}/record/".format(BASE_URL)
TWILIO_PHONE_NUMBER = os.getenv("TWILIO_PHONE_NUMBER")
保存settings.py并进入caller Django应用目录。
使用以下新代码更新 djtranscribe/caller/urls.py:
# djtranscribe/caller/urls.py
from django.conf.urls import url
from . import views

urlpatterns = [
    url(r'dial/(\d+)/$', views.dial, name="dial"),
    url(r'record/$', views.record_twiml, name="record-twiml"),
    url(r'get-recording-url/([A-Za-z0-9]+)/$', views.get_recording_url,
        name='recording-url'),
]
接下来,打开 djtranscribe/views.py 并使用以下代码更新它,替换文件中已存在的内容:
# djtranscribe/caller/views.py
from django.conf import settings
from django.http import HttpResponse
from django.views.decorators.csrf import csrf_exempt

from twilio.rest import Client
from twilio.twiml.voice_response import VoiceResponse


def dial(request, phone_number):
    """Dials an outbound phone call to the number in the URL. Just
    as a heads up you will never want to leave a URL like this exposed
    without authentication and further phone number format verification.
    phone_number should be just the digits with the country code first,
    for example 14155559812."""
    # pulls credentials from environment variables
    twilio_client = Client()
    call = twilio_client.calls.create(
            to='+{}'.format(phone_number),
            from_=settings.TWILIO_PHONE_NUMBER,
            url=settings.TWIML_INSTRUCTIONS_URL,
    )
    print(call.sid)
    return HttpResponse("dialing +{}. call SID is: {}".format(
                            phone_number, call.sid))


@csrf_exempt
def record_twiml(request):
    """Returns TwiML which prompts the caller to record a message"""
    # Start our TwiML response
    response = VoiceResponse()

    # Use <Say> to give the caller some instructions
    response.say('Ahoy! Call recording starts now.')

    # Use <Record> to record the caller's message
    response.record()

    # End the call with <Hangup>
    response.hangup()

    return HttpResponse(str(response), content_type='application/xml')


def get_recording_url(request, call_sid):
    """Returns an HttpResponse with plain text of the link to one or more
    recordings from the specified Call SID."""
    # pulls credentials from environment variables
    twilio_client = Client()
    recording_urls = ""
    call = twilio_client.calls.get(call_sid)
    for r in call.recordings.list():
        recording_urls="\n".join([recording_urls, "".join(['https://api.twilio.com', r.uri])])
    return HttpResponse(str(recording_urls), 200)
上述每个视图函数都执行创建 Twilio 拨打的电话的通话记录所需的步骤之一,然后将其作为文件检索。 dial 以编程方式启动出站呼叫,record_twiml 返回指令以播放正在录制呼叫的消息,进行录制,然后在呼叫完成后挂断。 get_recording_url 仅返回电话录音的 URL 位置,以便在下一步中我们可以将文件发送到 AssemblyAI。
我们的Django项目修改完成。接下来,我们需要使用两个服务,Twilio 和 Ngrok,使一些机器能够从我们的本地机器调用和运行应用程序。
Twilio 凭据和环境变量
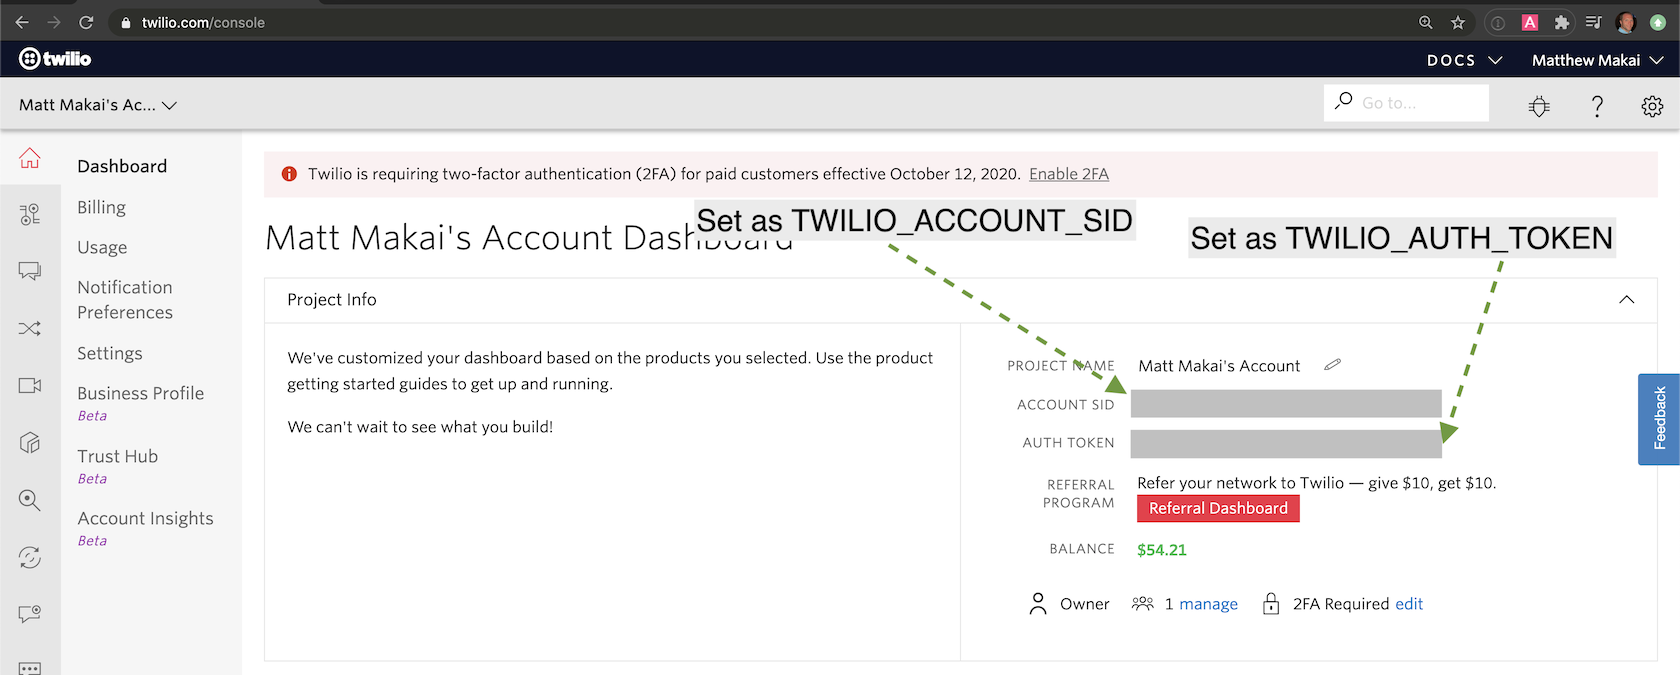
注册 Twilio 或登录您现有的帐户。进入 Twilio 控制台后,您可以在右侧获取 TWILIO_ACCOUNT_SID 和 TWILIO_AUTH_TOKEN页面:
当您注册时,您应该为您的帐户分配了一个电话号码。您可以使用它或购买一个新的电话号码来使用。
使用 ## 设置三个环境变量,名称分别为 命令在你的终端。请确保将这些值替换为您自己的帐户 SID、授权令牌和 Twilio 电话号码。TWILIO_ACCOUNT_SID、TWILIO_AUTH_TOKEN 和 TWILIO_PHONE_NUMBER #
export TWILIO_ACCOUNT_SID=xxxxxxxxxxxxx    # found in twilio.com/console
export TWILIO_AUTH_TOKEN=yyyyyyyyyyyyyy    # found in twilio.com/console
export TWILIO_PHONE_NUMBER=+17166382453    # replace with your Twilio number
请注意,您必须在每个命令行窗口中使用 export 命令来确保可以访问此键。如果您没有在运行脚本的环境中导出令牌,我们正在编写的脚本将无法访问 Twilio API。
在运行 app.py 之前,还有一个环境变量需要设置。我们需要使用 Ngrok 作为本地主机隧道,以便 Twilio 的 webhook 可以向运行在我们的 Django 应用程序发送 HTTP POST 请求本地开发环境。
在新的终端窗口中运行 Ngrok,因为在我们运行其他 Python 代码时您需要保持它运行:
./ngrok http 8000
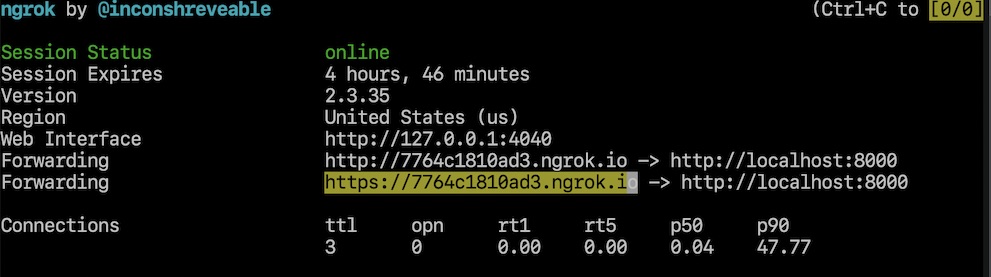
复制“转发”URL 的 HTTPS 版本并为其设置 BASE_URL 环境变量值。例如,在此屏幕截图中,您可以使用以下命令将 BASE_URL 设置为 https://7764c1810ad3.ngrok.io:
export BASE_URL=https://7764c1810ad3.ngrok.io # use your ngrok URL, or domain. no trailing slash
我们还需要更新 djtranscribe/djtranscribe/settings.py 的 ALLOWED_HOSTS 列表以包含 Ngrok 转发 URL,否则来自 Twilio 的 webhook 要求有关如何处理电话的说明将失败。打开 settings.py 文件并使用您的 Ngrok Forwardinghostname 列表更新 ALLOWED_HOSTS 如下:
# SECURITY WARNING: keep the secret key used in production secret!
SECRET_KEY = os.getenv('SECRET_KEY', 'development key')

# SECURITY WARNING: don't run with debug turned on in production!
DEBUG = True

ALLOWED_HOSTS = ['7764c1810ad3.ngrok.io','127.0.0.1','localhost']


# Application definition

INSTALLED_APPS = [
    'django.contrib.admin',
    'django.contrib.auth',
    'django.contrib.contenttypes',
    'django.contrib.sessions',
    'django.contrib.messages',
    'django.contrib.staticfiles',
    'caller',
]
好的,我们终于可以重新运行我们的 Django 网络应用程序了。确保 Ngrok 仍在不同的窗口中运行,您的 virtualenv 处于活动状态并且在此终端中设置了四个环境变量,然后在 ## 所在的根项目目录中运行 位于:runserver 命令#
python manage.py runserver
让我们通过测试应用程序让我们的电话响起。
测试 Twilio 可编程语音录制
我们可以通过访问本地主机的 8000 端口来测试我们的应用程序。在您的 Web 浏览器中访问此 URL,将“14155551234”替换为您要拨打的电话号码,在线人员将被记录在该电话号码中:http: //localhost:8000/dial/14155551234.
该号码现在应该会收到来自您的 Twilionumber 的电话。拿起并录制一条您要用于测试转录的消息,然后挂断。
如果出现错误,请确保设置了所有环境变量。您可以使用 echo 命令检查这些值,如下所示:
echo $BASE_URL
通话结束后,复制网页上显示的通话SID,方便我们查找录音文件的存放位置。

最后调用 SID 转到“localhost:8000/get-recording-url/”。例如,“localhost:8000/get-recording-url/CAda3f2f49ff4e8ef2be6b726edb998c92”。

复制除末尾“.json”之外的整个输出,然后将其粘贴到 Web 浏览器的 URL 栏中,以“api.twilio.com”为前缀。例如,“https://api.twilio.com” /2010-04-01/Accounts/ACe3737affa0d2e17561ad44c9d190e70c/Recordings/RE3b42cf470bef829c3680ded961a09300”。这将调出录音。复制整个 URL,我们将使用它作为 AssemblyAI 服务的输入。
使用 AssemblyAI API 转录
我们现在可以使用 AssemblyAI API 对刚刚制作的通话录音进行语音到文本的转录。
注册一个 AssemblyAI 帐户并登录到 AssemblyAI 仪表板,然后复制“您的 API 令牌”,如屏幕截图所示:
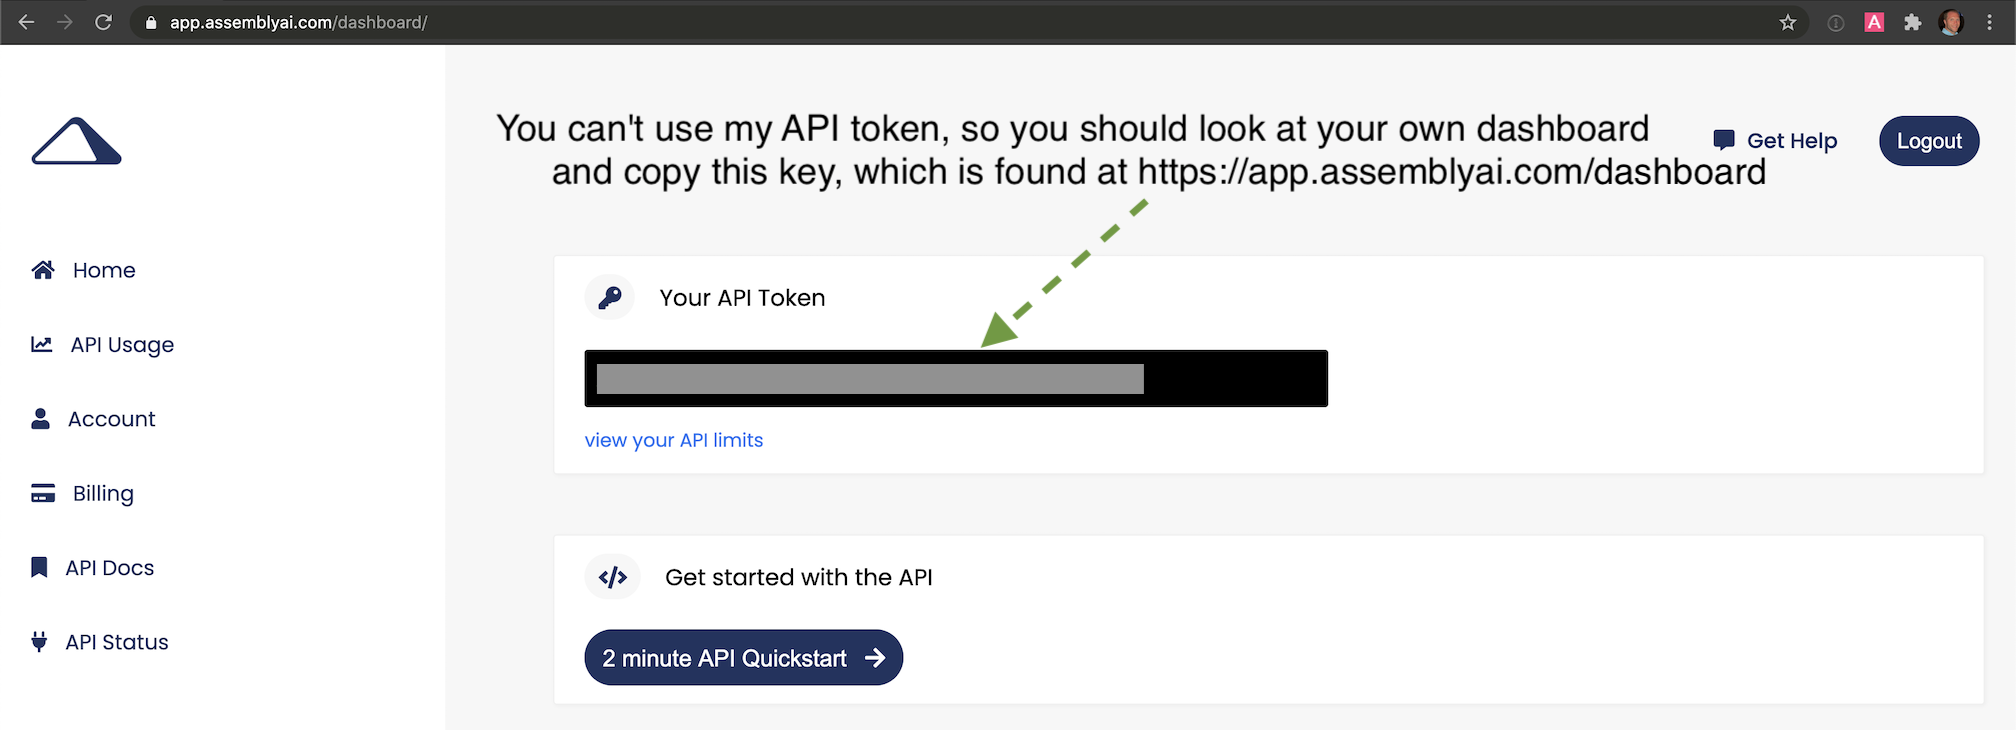
我们需要将我们的 AssemblyAI API 密钥导出为环境变量,以便我们的 Python 应用程序可以使用它来对他们的 API 进行身份验证。我们还需要为录制传递可公开访问的 URL,因此我们也将其设置为环境变量。
# make sure to replace this URL with the one for your recording
export ASSEMBLYAI_KEY=your-api-key-here
export RECORDING_URL=https://api.twilio.com/2010-04-01/Accounts/ACe3737affa0d2e17561ad44c9d190e70c/Recordings/RE3b42cf470bef829c3680ded961a09300
创建一个名为transcribe.py的新文件,并在其中写入以下代码:
import os
import requests

endpoint = "https://api.assemblyai.com/v2/transcript"

json = {
  "audio_url": os.getenv("RECORDING_URL")
}

headers = {
    "authorization": os.getenv("ASSEMBLYAI_KEY"),
    "content-type": "application/json"
}

response = requests.post(endpoint, json=json, headers=headers)

print(response.json())
上面的代码使用密钥调用 AssemblyAI 转录服务,并将带有文件记录的 URL 传递给它。脚本打印出服务的 JSON 响应,其中将包含一个转录 ID,我们将使用它来访问之后的结果他们完成处理。
使用python 命令运行脚本:
python transcribe.py
你会得到一些 JSON 作为输出,类似于你在这里看到的:
{'audio_end_at': None, 'acoustic_model': 'assemblyai_default', 'text': None, 'audio_url': 'https://api.twilio.com/2010-04-01/Accounts/ACe3737affa0d2e17561ad44c9d190e70c/Recordings/RE3b42cf470bef829c3680ded961a09300', 'speed_boost': False, 'language_model': 'assemblyai_default', 'redact_pii': False, 'confidence': None, 'webhook_status_code': None, 'id': 'zibe9vwmx-82ce-476c-85a7-e82c09c67daf', 'status': 'queued',
'boost_param': None, 'words': None, 'format_text': True, 'webhook_url': None, 'punctuate': True, 'utterances': None, 'audio_duration': None, 'auto_highlights': False, 'word_boost': [], 'dual_channel': None, 'audio_start_from': None}
查找包含在 JSON 响应的 id 字段中的值。我们需要该值来查找转录的最终结果。复制转录 ID 并将其设置为环境变量以用作最终脚本的输入:
# replace with what's found within `id` from the JSON response
export TRANSCRIPTION_ID=aksd19vwmx-82ce-476c-85a7-e82c09c67daf
我们只需要更多的 Python 来查找结果,我们就完成了。
检索 AssemblyAI 转录
AssemblyAI 将忙于转录录音。根据文件的大小,完成作业可能需要几秒到几分钟不等。我们可以使用以下代码来查看作业是仍在进行中还是已经完成。如果转录完成,它会将结果打印到终端。
使用以下代码创建一个名为 print_transcription.py 的新文件:
import os
import requests

endpoint = "https://api.assemblyai.com/v2/transcript/{}".format(os.getenv("TRANSCRIPTION_ID"))

headers = {
    "authorization": os.getenv("ASSEMBLYAI_KEY"),
}

response = requests.get(endpoint, headers=headers)

print(response.json())
print("\n\n")
print(response.json()['text'])
print_transcription.py 中的代码与前面的transcribe.py 源文件中的代码非常相似。从 Python 标准库中导入 os(操作系统),就像我们在前两个文件中所做的那样,获取 TRANSCRIPTION_ID 和 ### 环境变量值。
endpoint 是用于检索转录的 AssemblyAI API 端点。我们设置适当的 authorization 标头并使用 requests.get 函数进行 API 调用。然后我们打印出 JSON 响应以及转录的文本。
是时候测试这第三个文件了。在终端中执行以下命令:
python print_transcription.py
您的输出将根据您的记录而有所不同,但您应该在终端中看到类似于以下内容的结果:
{'audio_end_at': None, 'acoustic_model': 'assemblyai_default', 'auto_highlights_result': None, 'text': 'An object relational mapper is a code library that automates the transfer of data stored in a relational database tables into objects that are more commonly used in application. Code or MS provide a high level abstraction upon a relational database that allows the developer to write Python code. Instead of sequel to create read update and delete data and schemas in their database developers can use the programming language that they are comfortable with comfortable to work with the database instead of writing sequel statements or short procedures.', 'audio_url': 'https://api.twilio.com/2010-04-01/Accounts/ACe3737affa0d2e17561ad44c9d190e70c/Recordings/RE3b42cf470bef829c3680ded961a09300', 'speed_boost': False, 'language_model': 'assemblyai_default', 'id': 'zibe9vwmx-82ce-476c-85a7-e82c09c67daf', 'confidence': 0.931797752808989, 'webhook_status_code': None, 'status': 'completed', 'boost_param': None, 'redact_pii': False, 'words': [{'text': 'An', 'confidence': 1.0, 'end': 90, 'start': 0}, {'text': 'object', 'confidence': 0.94, 'end': 570, 'start': 210}, {'text': 'relational', 'confidence': 0.89, 'end': 1080, 'start': 510}, {'text': 'mapper', 'confidence': 0.97, 'end': 1380, 'start': 1020}, {'text': 'is', 'confidence': 0.88, 'end': 1560, 'start': 1350}, {'text': 'a', 'confidence': 0.99, 'end': 1620, 'start': 1500}, {'text': 'code', 'confidence': 0.93, 'end': 1920, 'start': 1620}, {'text': 'library', 'confidence': 0.94, 'end': 2250, 'start': 1860}, {'text': 'that', 'confidence': 0.99, 'end': 2490, 'start': 2220}, {'text': 'automates', 'confidence': 0.93, 'end': 2940, 'start': 2430}, {'text': 'the', 'confidence': 0.95, 'end': 3150, 'start': 2910}, {'text': 'transfer', 'confidence': 0.98, 'end': 3510, 'start': 3090}, {'text': 'of', 'confidence':
0.99, 'end': 3660, 'start': 3480}, {'text': 'data', 'confidence': 0.84, 'end': 3960, 'start': 3630}, {'text': 'stored', 'confidence': 0.89, 'end': 4350, 'start': 3900}, {'text': 'in', 'confidence': 0.98, 'end': 4500, 'start': 4290}, {'text': 'a', 'confidence': 0.85, 'end': 4560, 'start': 4440}, {'text': 'relational', 'confidence': 0.87, 'end': 5580, 'start': 4500}, {'text': 'database', 'confidence': 0.92, 'end':
6030, 'start': 5520}, {'text': 'tables', 'confidence': 0.93, 'end': 6330, 'start': 5970}, {'text': 'into', 'confidence': 0.92, 'end': 7130, 'start': 6560}, {'text': 'objects', 'confidence': 0.96, 'end': 7490, 'start': 7100}, {'text': 'that', 'confidence': 0.97, 'end': 7700, 'start': 7430}, {'text': 'are', 'confidence': 0.9, 'end': 7850, 'start': 7640}, {'text': 'more', 'confidence': 0.97, 'end': 8030, 'start': 7790}, {'text': 'commonly', 'confidence': 0.92, 'end': 8480, 'start': 7970}, {'text': 'used', 'confidence': 0.86, 'end': 8750, 'start': 8420}, {'text': 'in', 'confidence': 0.94, 'end': 9050, 'start': 8840}, {'text': 'application.', 'confidence': 0.98, 'end': 9860, 'start': 9110}, {'text': 'Code', 'confidence': 0.93, 'end': 10040, 'start': 9830}, {'text': 'or', 'confidence': 1.0, 'end': 11210, 'start': 10220}, {'text': 'MS', 'confidence': 0.83, 'end': 11480, 'start': 11180}, {'text': 'provide', 'confidence': 0.94, 'end': 11870, 'start': 11510}, {'text': 'a', 'confidence': 1.0, 'end': 11960, 'start': 11840}, {'text': 'high', 'confidence': 1.0, 'end': 12200, 'start': 11930}, {'text': 'level', 'confidence': 0.94, 'end': 12440, 'start': 12170}, {'text': 'abstraction', 'confidence': 0.95, 'end': 12980, 'start': 12410}, {'text':
'upon', 'confidence': 0.94, 'end': 13220, 'start': 12950}, {'text': 'a', 'confidence': 1.0, 'end': 13280, 'start': 13160}, {'text': 'relational', 'confidence': 0.94, 'end': 13820, 'start': 13280}, {'text': 'database', 'confidence': 0.95, 'end': 14210, 'start': 13790}, {'text': 'that', 'confidence': 0.96, 'end': 14420, 'start': 14150}, {'text': 'allows', 'confidence': 0.99, 'end': 14720, 'start': 14360}, {'text':
'the', 'confidence': 0.56, 'end': 14870, 'start': 14690}, {'text': 'developer', 'confidence': 0.98, 'end': 15290, 'start': 14810}, {'text': 'to', 'confidence': 0.94, 'end': 15410, 'start': 15230}, {'text': 'write', 'confidence': 0.96, 'end': 15680, 'start': 15380}, {'text': 'Python', 'confidence': 0.94, 'end': 16070, 'start': 15620}, {'text': 'code.', 'confidence': 0.98, 'end': 16310, 'start': 16070}, {'text': 'Instead', 'confidence': 0.97, 'end': 17160, 'start': 16500}, {'text': 'of', 'confidence': 0.93, 'end': 17340, 'start': 17130}, {'text': 'sequel', 'confidence': 0.86, 'end': 17820, 'start': 17280}, {'text': 'to', 'confidence': 0.91, 'end': 18090, 'start': 17880}, {'text': 'create', 'confidence': 0.89, 'end': 18450, 'start': 18090}, {'text': 'read', 'confidence': 0.88, 'end': 18840, 'start': 18480}, {'text': 'update', 'confidence': 0.92, 'end': 19290, 'start': 18870}, {'text': 'and', 'confidence': 0.94, 'end': 19590, 'start': 19230}, {'text': 'delete', 'confidence': 0.89, 'end': 19920, 'start': 19530}, {'text': 'data',
'confidence': 0.95, 'end': 20190, 'start': 19890}, {'text': 'and', 'confidence': 0.92, 'end': 20490, 'start': 20250}, {'text': 'schemas', 'confidence': 0.86, 'end': 21000, 'start': 20430}, {'text': 'in', 'confidence': 0.94, 'end': 21210, 'start': 21000}, {'text': 'their', 'confidence': 0.98, 'end': 21510, 'start': 21150}, {'text': 'database', 'confidence': 0.97, 'end': 21900, 'start': 21450}, {'text': 'developers', 'confidence': 0.83, 'end': 23200, 'start': 22420}, {'text': 'can', 'confidence': 0.95, 'end': 23440, 'start': 23200}, {'text': 'use', 'confidence': 0.97, 'end': 23650, 'start': 23410}, {'text': 'the', 'confidence': 0.99, 'end': 23890, 'start': 23590}, {'text': 'programming', 'confidence': 0.97, 'end': 24370, 'start': 23830}, {'text': 'language', 'confidence': 1.0, 'end': 24700, 'start': 24310}, {'text': 'that', 'confidence': 1.0, 'end': 24880, 'start': 24640}, {'text': 'they', 'confidence': 0.99, 'end': 25060, 'start': 24820}, {'text': 'are', 'confidence': 0.85, 'end': 25210, 'start': 25000}, {'text': 'comfortable', 'confidence': 0.92, 'end': 25780, 'start': 25180}, {'text': 'with', 'confidence': 1.0, 'end': 25960, 'start': 25720}, {'text': 'comfortable', 'confidence': 0.94, 'end': 29090, 'start': 28090}, {'text': 'to', 'confidence': 0.84, 'end': 29840, 'start': 29180}, {'text': 'work', 'confidence': 0.95, 'end': 30050, 'start': 29780}, {'text': 'with', 'confidence': 0.98, 'end': 30290, 'start': 30020}, {'text': 'the', 'confidence': 0.69, 'end': 30440, 'start': 30230}, {'text': 'database', 'confidence': 0.98, 'end': 30860, 'start': 30380}, {'text': 'instead', 'confidence': 1.0, 'end': 32780, 'start': 31780}, {'text': 'of', 'confidence': 0.98, 'end': 32900, 'start': 32720}, {'text': 'writing', 'confidence': 0.87, 'end': 33320, 'start': 32870}, {'text': 'sequel', 'confidence': 0.88, 'end': 33860, 'start': 33290}, {'text': 'statements', 'confidence': 0.95, 'end': 34310, 'start': 33800}, {'text': 'or', 'confidence': 0.9, 'end': 34460, 'start': 34250}, {'text': 'short', 'confidence': 0.9, 'end': 34790, 'start': 34430}, {'text': 'procedures.', 'confidence': 0.98, 'end': 35270, 'start': 34760}], 'format_text': True, 'webhook_url': None, 'punctuate': True, 'utterances': None, 'audio_duration': 36.288, 'auto_highlights': False, 'word_boost': [],
'dual_channel': None, 'audio_start_from': None}


An object relational mapper is a code library that automates the transfer of data stored in a relational database tables into objects that are more commonly used in application. Code or MS provide a high level abstraction upon a relational database that allows the developer to write Python code. Instead of sequel to create read update and delete data and schemas in their database developers can use the programming language that they are comfortable with comfortable to work with the database instead of writing sequel statements or short procedures.
这是很多输出。第一部分包含转录结果和对每个转录单词准确性的置信度。第二部分只是转录的纯文本输出。
您现在可以使用此基本代码并将其添加到需要高质量文本到语音转录的任何应用程序中。如果结果对您来说还不够好,请查看本教程以提高关键字或短语的准确性。
其他资源
我们刚刚构建了一个高度准确的录音转录应用程序。
接下来,尝试一些其他相关的 Django 教程:
- 在 Django 项目中使用 Sentry 处理 Python 异常
- 在 Django 中使用 django-user-visit 跟踪每日用户数据
- 如何在 Django 中快速使用 Bootstrap 4带有 CDN 的模板
有问题吗?在 Twitter@fullstackpython 或@mattmakai 上通过 Full Stack Python 存储库上的 GitHub 问题票让我知道。看到这篇文章有什么问题吗?在 GitHub 上创建此页面的源代码并提交拉取请求。
